REVEN v2 installation guidelines
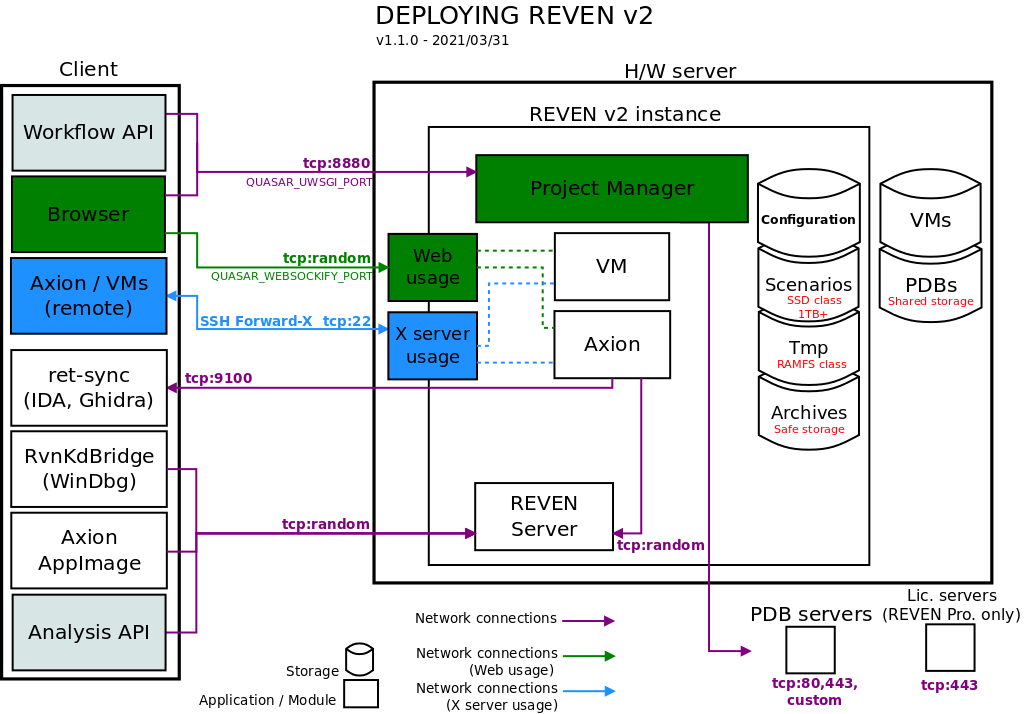
This section will guide you through the process of installing REVEN. You will find in Annex I an overview of REVEN deployment.
License information
REVEN v2 implements programs governed by a free or open source license. The corresponding list of programs, their license(s) and source code are available at https://github.com/tetrane/tetrane-oss. These programs come with ABSOLUTELY NO WARRANTY; before using, modifying or distributing them, please make sure to read their license and accept the attached terms and conditions; you are welcome to redistribute free or open source software under certain conditions.
Pre-requisites
Server hardware
Here are some configuration hints for running an instance of REVEN. When in doubt, don't hesitate to contact us at support@tetrane.com.
NOTE: Installing the REVEN server on a virtual machine is not supported.
Processor
The main CPU bottleneck, when using REVEN with a high performance storage solution, is the replay step, which is using around 4 cores and is highly dependent on single core performance (high frequency and/or high IPC) of the CPU.
In the Professional Edition, you can replay only one scenario at a time. So REVEN will use a maximum of 4 cores for the replay, 2 others for scenario analysis and 2 others cores for the Project Manager.
In the Enterprise Edition, you can replay and analyze an unlimited number of scenarios at a time, so determining how many cores are needed will depend on your usage of REVEN.
Our recommendation is to choose a high-frequency Intel or AMD processor(*) with at least 8 cores. Besides, the most recent processor, the most performance you will get out of it. So, last-gen processors are the best choice. On lower-performance processor, REVEN can still be used but will be slower.
A desktop processor is good enough in a large number of cases. Server processors tend to have a higher number of cores but reduced single core performance. They may be preferred when your workload consists of several concurrent replay tasks or scenario analysis sessions. Mobile processors can be used although they often exhibit lower performance than desktop processors.
(*): Currently, AMD processors can only be used to record QEMU virtual machines, not VirtualBox virtual machines. See the pros and cons of both QEMU and VirtualBox virtual machines here. Unless you have specific recording requirements, we generally recommend using QEMU virtual machines.
Memory
In terms of capacity, in the Professional Edition, the minimum is 16GB but we recommend to have at least 32GB. For the Enterprise Edition, it also depends on your usage (number of simultaneous replays and running REVEN servers).
NOTE: To avoid curbing your high-end processor, having fast enough RAM (frequency + timing) is necessary.
Storage
REVEN is highly I/O performance dependent, and requires at least a SATA SSD, but we recommend having a NVME SSD or better. Note that any type of RAID-0 configuration may help reduce the disk I/O bottleneck. For example if you have a really high-end processor and/or if you will replay multiple scenarios at a time.
As scenarios/VMs can require up to hundreds of GB on disk, the minimum capacity of your storage should be 1TB. We recommend 2TB or more to work on more unarchived scenario in parallel and reduce import/export operations.
We also recommend having extra HDD storage to archive unused scenarios.
Internet access
In the Professional Edition, an active Internet access to https://api.keygen.sh and https://dist.keygen.sh is required while using REVEN.
For both editions, an active Internet access is recommended for downloading symbol information, unless you are using an offline PDB server (see also Obtaining OSSI for a scenario).
Debian operating system
The REVEN v2 package must be installed on a Debian 10 Buster amd64 system.
Storage
The list below shows how REVEN organizes its data, together with the corresponding configuration variables that can be set during the installation process.
-
Installation path:
QUASAR_REVEN_ROOT_PATH
Automatically set bystart.shwith its own directory. -
VM:
QUASAR_QEMU_SCAN_PATH
The VM repository containing the QEMU images, should be fast for snapshot save/load operations. -
REVEN scenarios:
QUASAR_ROOT
VM-specific files such as their filesystems, the REVEN recordings, the replay files, which may be quite large (hundreds of GB). Storage requires a high I/O throughput, to get the best performance out of REVEN (e.g. SSD).
Since this directory will contain SQlite databases, be careful not to have it being in an NFS mount, or you may experience some difficulties and bugs. -
PDBs:
QUASAR_SYMBOL_STORE
Can be shared between users and/or machines. -
Archives:
QUASAR_ARCHIVES_PATH
The scenarios exports. Can be used for backups. Storage can be slow, should be safe (RAID, ZFS, ...). -
Temporary directory:
QUASAR_TMP
A work directory for REVEN. The faster the better. Putting that directory in a RAMFS mount point will even help reduce latency during scenario recording.
Networking
The list below shows networking requirements and options between the REVEN server and other machines. Make sure any filtering device is configured to allow these connections.
-
Main Project Manager interface:
QUASAR_UWSGI_PORT
By default, the Project Manager listens on port 8880. -
VMs and Axion Web usage:
QUASAR_USE_VNC=True
By default, VMs and Axion displays are served through a random port. The settings variableQUASAR_WEBSOCKIFY_PORTallows to set a fixed value for this port. -
VMs and Axion X server usage:
QUASAR_USE_VNC=False
For this usage, you must be able to run X server applications in the terminal where REVEN is started: remote X or native X server will both work.
A common situation is to use SSH X forwarding, in which case the SSH port must be open. -
REVEN server ports for Axion, Python API, WinDbg bridge: REVEN server listens on any port of the ephemeral port range, which defaults to [32768, 60999] on Debian. You may want to access these ports when using Axion, the REVEN Python API or the WinDbg bridge from a remote client. In which cases a VPN may prove useful.
NOTE: Implementing a reverse-proxy in front of REVEN may simplify the requirements on network filtering. Please refer to the specific reverse-proxy section.
-
Connections to the symbol servers:
QUASAR_SYMBOL_SERVERS
Any symbol server listed in the symbol server list must be accessible to the Project Manager and the REVEN server. -
Connection to ret-sync (IDA/GHIDRA): IDA/GHIDRA synchronization with a REVEN trace requires Axion to connect to the machine running IDA/GHIDRA (port 9100 by default). Here again, a VPN may prove useful.
NOTE: When the installation is on a machine using a proxy to access the network you should set QUASAR_HTTP_PROXY and QUASAR_HTTPS_PROXY so that the symbol servers and, in the case of the professional edition, the license server, are accessible. Please refer to the settings file for more information and examples about how to fill out these variables.
Installing REVEN v2
Follow the steps below to install REVEN v2:
-
Unwrap the REVEN v2 package. You can choose to install it anywhere you want on your file system. Change your current directory to the root of the unwrapped package.
-
Install the required system dependencies:
./install.sh
This will ask for yoursudopassword in order to install the system dependencies.NOTE: For information and documentation about
sudo, please find the Debian documentation here.NOTE: If you have a separate privileged account, then it's not a problem to run
install.shwith this account, since the install process does not depend on any particular user-specific variable. -
Add your user to the group
kvm:
sudo adduser your_user kvm -
Install the REVEN environment:
./start.sh -
Adjust the installation settings:
- Edit the
settings.pyfile to fit your needs.- You'll probably want to touch the
QUASAR_SYMBOL_SERVERSvariable. - By default, the
QUASAR_ROOTwill point in your home directory (~/Reven2). See the storage requirements above for more information.
- You'll probably want to touch the
NOTE: User-wide parameters can also be set in a ~/.config/tetrane/quasar.py
file. It's the recommended place for QUASAR_SYMBOL_SERVERS and custom
QUASAR_ROOT, QUASAR_QEMU_SCAN_PATH, QUASAR_ARCHIVES_PATH,
QUASAR_SYMBOL_STORE, and QUASAR_USE_VNC.
Using REVEN v2 for the first time
REVEN v2 comes with new services accessible through a new web interface named REVEN Project Manager to manage Virtual Machines, scenarios and associated data, and to launch Axion on those scenarios.
Local use from the REVEN host
When locally logged in the REVEN host, use REVEN v2 as follows:
- Launch the Project Manager services, with the following command at the root of the installation directory:
./start.sh
- Then point your favorite web browser to the Project Manager's homepage:
http://your-reven-host:8880/
NOTE: The Project Manager will run X programs for you to record a scenario, or to access the Axion GUI.
Remote use
Through web browser
The simplest way to use REVEN v2 on a remote server, is to set the
QUASAR_USE_VNC setting to True. This will make everything, from the virtual
machines to Axion, to be accessible directly from the browser.
Don't forget to restart the Project Manager after changing this setting.
This feature is known to have a few limitations by design:
- Copy-pasting will work with Axion sessions, but not with VM sessions, since this would require QEMU or VirtualBox to have hooks in the OS they virtualize. This is the same for the "Remote resizing" feature.
- Some keyboard shortcuts may be caught by your desktop environment or web browser before being sent to VNC. This can usually be worked around using the "Extra keys" in the NoVNC UI or reconfiguring your Axion shortcuts.
With X forwarding
When not locally logged in the REVEN host, but working from a remote client, use REVEN v2 as follows:
- Connect to the REVEN v2 host through SSH with X forwarding enabled:
ssh -Y your-login@your-reven-hostThen use the Project Manager as you would locally.
- Launch the Project Manager services, with the following command at the root of the installation directory:
./start.sh
- Point your favorite web browser to the Project Manager's homepage:
https://your-reven-host:8880/
NOTE: In this configuration, other users should not use your REVEN v2 instance as X applications would be redirected to your display.
They will need to launch their own instance of the Project Manager (See next section).
Installing the Axion AppImage package on a remote client
To install Axion (REVEN GUI) on a remote Windows or Linux client, Tetrane provides an AppImage package.
NOTE: Again, connecting an Axion client remotely may require configuring your network. See above for more details.
Installing the Axion AppImage package on Windows 10
- Install Windows Subsystem for Linux (WSL) - follow Microsoft's doc
- Install a linux distribution: the following instructions are valid on Debian & Ubuntu, but the AppImage is designed to work on any other if you prefer a different distribution.
- Install Xming (or another X Windows Server that runs on Windows) and launch it
- Warning: if you run the AppImage in WSL2, you must start Xming through the XLaunch app and check
No Access Controlbecause both your Windows & Linux environments are going to communicate through the network.
- From the WSL shell:
- Install some dependencies from the WSL shell:
# install base dependencies sudo apt update sudo apt install x11-apps sudo apt install libgl1-mesa-glx sudo apt install libharfbuzz-bin # optionally, users can install xfce4 to have a graphical theme sudo apt install xfce4 - Export the display to be able to use graphical applications:
# On WSL1 export DISPLAY=:0 # On WSL2 linux runs on a separate network than the host, so you must point to the host's address # Because of that, you must also create a Windows firewall inbound rule to allow connections to port 6000 # and ensure your X server running on the host allows connection from the WSL guest. export DISPLAY=$(awk '/nameserver / {print $2; exit}' /etc/resolv.conf 2>/dev/null):0 # And to test the display: xeyes - Extract the appimage:
/mnt/c/.../Axion-x.y.z.AppImage --appimage-extract - Execute Axion:
./squashfs-root/AppRun
- Install some dependencies from the WSL shell:
Installing the Axion AppImage package on Linux
All you need to do is make it executable and run it. It is a compressed image with all the dependencies and libraries needed to run the desired software. So there is no extraction, no installation needed. You can uninstall it by deleting it.
Installing a license
Professional edition
After the first launch of the Project Manager, you will be required to install a license.
To install your license you will need to follow the steps below:
-
Point your favorite web browser to the Project Manager's homepage:
http://your-reven-host:8880/. The welcome screen will ask for your license key that was provided to you with your order of the Professional Edition. -
Provide the license key. You will then land on the license activation screen.
-
On the license activation screen, set a name for your current REVEN v2 installation. This operation binds the license to the current server installation. You will then reach the Project Manager home screen.
-
Check the license status in the
Abouttab of the Project Manager. It should display the name of the license holder as specified in your order, the expiry date of your license and the installation name you just provided.
Enterprise edition
NOTE: An active internet connection is not required for installing a REVEN Enterprise license.
After the first launch of the Project Manager, you will be required to install a license.
To install your license you will need to follow the steps below:
-
Point your favorite web browser to the Project Manager's homepage:
http://your-reven-host:8880/. The welcome screen will ask for your license key that was provided to you with your order of the Enterprise Edition. -
Provide the license key.
-
Check the license status in the
Abouttab of the Project Manager. It should display the name of the license holder as specified in your order, if any, and the expiry date of your license.
Stopping REVEN v2
Simply run ./stop.sh at the root of the installation directory, with the same user
that launched start.sh.
Troubleshooting
If you have any trouble somewhere, don't hesitate to take a look at the logs
located in ~/Reven2/<version>/Logs and contact support@tetrane.com for any help.
Moving a REVEN v2 installation directory
If you move the installation directory after running the first start.sh, you'll have
to manually reset the QUASAR_REVEN_ROOT_PATH variable in the settings.py file.
Installing the REVEN v2 Python API
Please refer to the dedicated installation document.
FAQ
What is Quasar?
Quasar is the component implementing the project manager.
The Project Manager is REVEN v2 Web user interface to manage Virtual
Machines, scenarios and associated data, and to launch Axion on those scenarios.
Where do I change the settings?
Per user settings
Some Project Manager settings can be changed at the user level, for
all the versions installed for this user, in the file ~/.config/tetrane/quasar.py.
This file can store settings common to all the user's versions of the Project
Manager, such as the list of symbol servers or some storage paths. It is created
the first time a Project Manager is started for the user.
IMPORTANT: Remember to run stop.sh then start.sh for every running
version of the Project Manager in order to take new settings into account.
Per instance settings
Some Project Manager settings can be changed at the instance level, at
the root of the installation directory, in the file settings.py. It is created
the first time an instance is started.
IMPORTANT: Remember to run stop.sh then start.sh in order to take new
settings into account.
What settings may I change?
Here are some important settings you may want to tune:
QUASAR_ROOT: this is where most of the files will be stored. It is by default in your home directory (~/Reven2), but you may change it to use a custom path.QUASAR_QEMU_SCAN_PATH: this defines where the QEMU Virtual Machine QCOW files will be scanned for registration in the Project Manager. Since this will be scanned recursively, be careful not to put too large a file tree in there, or some Project Manager pages will become very slow.QUASAR_SYMBOL_STORE: this is the symbol cache that REVEN will use for storing PDB files it downloads. If this path is attached to a slow mount point, such as a centralized SSHFS mount point, you may experience latency in the Axion GUI. However, it may be a good idea to share this path with others, since everyone will take advantage of the cache.QUASAR_UWSGI_PORT: port the Project Manager web server will listen to.
What if I want to run multiple instances on the same machine?
You can run multiple instances of Project Manager on the same machine, as long as you set the multiple web interfaces to listen on different ports. You have two solutions to do that:
- Give the port number to
start.shas its first argument:
./start.sh 4000will make the web interface accessible on port 4000. - Set the port number permanently in one of your setting files, with the
variable
QUASAR_UWSGI_PORT, depending on your deployment configuration.
How to use REVEN behind a reverse-proxy?
It's no problem running a REVEN instance behind a reverse-proxy, as long as you follow those recommendations:
- (optional) Change the
QUASAR_UWSGI_PORTto a custom value (e.g. 8888) - Set the
QUASAR_USE_VNCvalue toTrue - Set the
QUASAR_WEBSOCKIFY_PORTto a fixed value (e.g. 6080) - Set the
QUASAR_WEBSOCKIFY_PUBLIC_PORTto the proxied value (e.g. 80) - Set the
QUASAR_JUPYTER_PORTto a fixed value (e.g. 8888) - Set the
QUASAR_JUPYTER_PUBLIC_PORTto the proxied value (e.g. 80)
Here is an example of a working nginx configuration using the above example values:
server {
    listen 80;

    location / {
        proxy_pass http://127.0.0.1:8888/;
        proxy_http_version 1.1;
        proxy_set_header X-Forwarded-For $proxy_add_x_forwarded_for;
        proxy_set_header X-Forwarded-Proto $scheme;
        proxy_set_header Host $host;
        proxy_set_header Authorization ""; # Ensure we clear the Authorization header for DRF.
    }

    location /websockify {
        proxy_pass http://127.0.0.1:6080/websockify;
        proxy_http_version 1.1;
        proxy_set_header Upgrade $http_upgrade;
        proxy_set_header Connection $http_connection;
        proxy_read_timeout 1800s; # Default is 60s, which is really low in this use-case.
    }

    location /jupyter/ {
        proxy_pass http://127.0.0.1:8888/jupyter/;
        proxy_http_version 1.1;
        proxy_set_header Host $host;
        proxy_set_header Upgrade $http_upgrade;
        proxy_set_header Connection $http_connection;
    }
}
Annex I: deployment overview