Advanced VM operations
This page will guide you through more advanced concepts and operations you can do on VM and snapshots. The need for these will arise when you start working more heavily with your VMs, changing configuration, installing new software, etc.
- Snapshot page in the Project Manager
- More about snapshots in QEMU
- VM Hardware options
- What preparing a snapshot is
- How to prepare a snapshot
- Disk snapshot statuses
Snapshot page in the Project Manager
To find a disk snapshot page:
- Browse to the VM manager tab.
- Find the VM you want in the list.
- To the right is the list of disk snapshots available for this VM.
- Click on the disk snapshot you want to access.
From this page, you can:
- Customize the hardware options
- Boot the VM:
- Access it
- Upload files via the CD-ROM
- Manage live snapshots
- Prepare the snapshot
More about snapshots in QEMU
We already cover basic differences between live and disk snapshots in the page What you must know, but here is the full view.
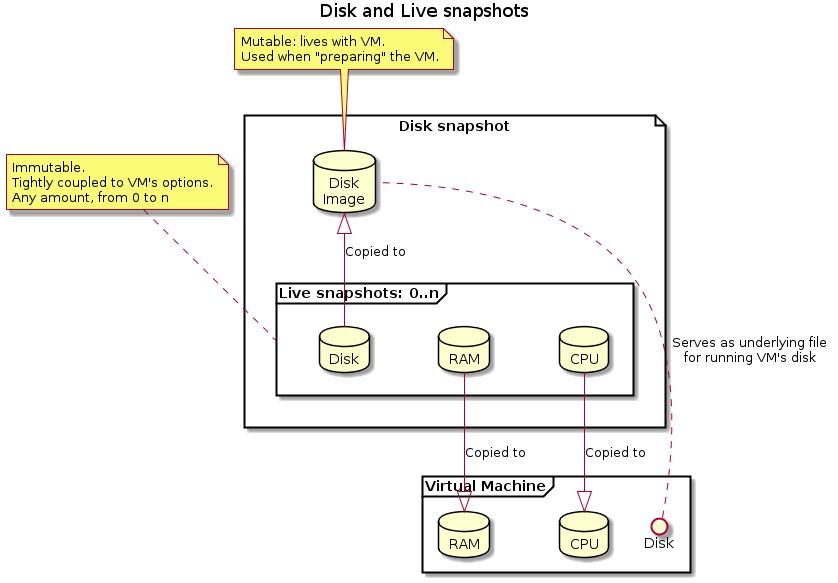
Disk snapshots:
- represent the mutable disk the VM has access to.
- are overwritten when restoring a live snapshot, with the latter's disk state.
- may be organized in a tree structure to save disk space.
Live snapshots:
- represent the full state of a VM, including memory, cpu registers and disk
- are immutable
- are tightly coupled to the options the VM has been started with: selecting the wrong options will prevent snapshots from loading (this includes "kvm", "network", or any custom guest hardware option). See the troubleshooting page about this.
- are stored inside a disk snapshot
qcow2file.
VM Hardware options
By default, when you start a snapshot, it is launched with the VM options (RAM size, network, custom QEMU options) that were provided during the Register VM step. You can override these options for this specific snapshot in the Running the VM section. Overridden options for a snapshot will be applied when starting the VM on this snapshot. You can restore an option to its VM value by unchecking the checkbox associated to this option.
What preparing a snapshot is
When importing a VM, the Wizard "prepares" the snapshot. This important operation does:
- Open the VM disk image (the current state of the disk snapshot),
- Parse it for binary & other relevant files,
- Extract these files over to the "prepared file system" for later use by the REVEN server.
The extracted files notably have two important uses:
- When displaying code from a binary in a Windows scenario, REVEN will use the real binary file in the prepared file system to identify which PDB to extract symbols from.
- Similarly in Linux scenarios, symbols will be extracted from the prepared file system, either from:
- The binary being run,
- A debug symbol file.
How to prepare a snapshot
IMPORTANT: you should prepare the snapshot again after installing new software to a VM to make sure the right binaries are accessible to the REVEN server.
You can prepare a snapshot from a VM's snapshot page:
- Browse to the VM manager tab, then click on a VM's snapshot to open its page,
- Locate the
Prepare the Snapshotsection at the top, - If your snapshot is already prepared and you want to force the preparation again, click on
Unprepareand wait for the operation to finish, - Click on the
Preparebutton.
See more below about Snapshots statuses after a Prepare operation.
Disk snapshot statuses
Disk snapshots can have the following statuses in the Project Manager, relating to OSSI availability:
: Prepared, means the filesystem has been extracted from the snapshot.
: Inherited, means the snapshot "inherits" the OSSI of a parent snapshot. NOTE: If the current snapshot contains new binaries compared to its parent snapshot, OSSI may not be available for these binaries in the Analysis stage. Should you need this OSSI, launch a Prepare operation on the current snapshot.
: Not prepared, means no Prepare operation has occurred for this snapshot. Therefore, no OSSI is available for this snapshot. Without OSSI, binary and symbol names will not be available in the Analysis stage.