Table of Contents
This page will guide you through the configuration of the REVEN Server with the following steps:
- Create and configure virtual machines for scenario generation.
- Tell REVEN which virtual machine to serve to Axion clients.
This page also features two optional steps related to the multiple user setup in REVEN and PDB information.
Preparing Virtual Machines
The REVEN server makes use of VirtualBox virtual machines in order to record the execution of the scenarios you want to analyze. This section describes how to setup a virtual machine that will be suitable for scenario recording.
Pre-requisites
- VirtualBox should have been installed during the REVEN server installation process. If no package is found, please check your installation.
- On the REVEN server, log in as user ‘root’ and set the ‘reven’ user’s password : NOTE: Choose a password whose strength complies with your server security policy.
- Log out.
- On the REVEN server, log in as user « reven », either from a local terminal, or remotely via a SSH connection with X11 forwarding: NOTE: Managing remotely a VirtualBox machine may also be done with solutions such as phpVirtualbox or remotebox. We will not document them here.
Create a Virtual Machine for scenario recording
- Create a virtual machine in VirtualBox (please refer to http://virtualbox.org/manual/ch01.html).
- Add an IDE adapter to the VM configuration (or make sure it exists). This can be done through the Storage section of virtual machine settings:
- Set the IDE adapter name to
reven. - Set it as CD-ROM / primary master device.
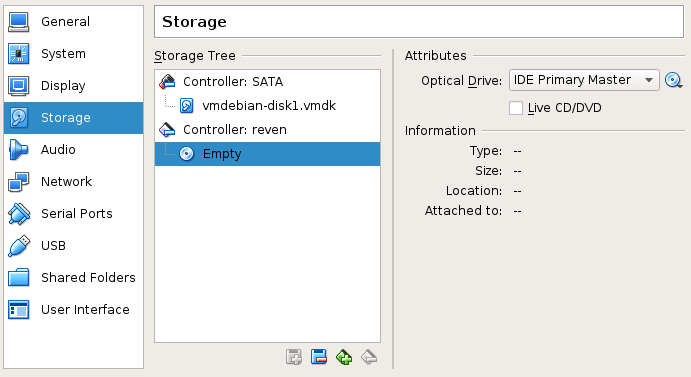 IDE configuration
- Set the IDE adapter name to
- Setup correctly the
Systemsettings:- In the
Processortab: set the number of processor to 1.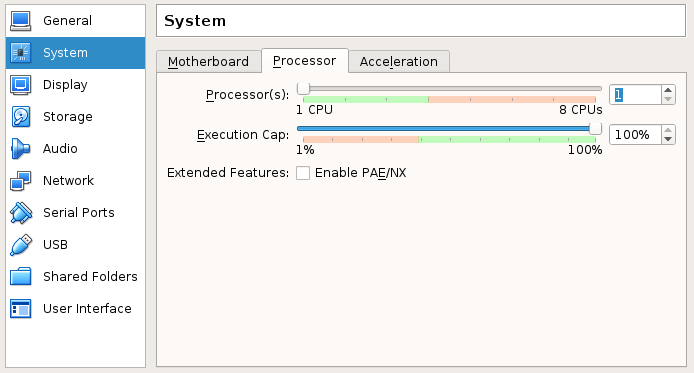 Processor configuration
 - In the
Accelerationtab:- Set the
Paravirtualization interfaceto None. - Check all boxes of
Hardware Virtualization.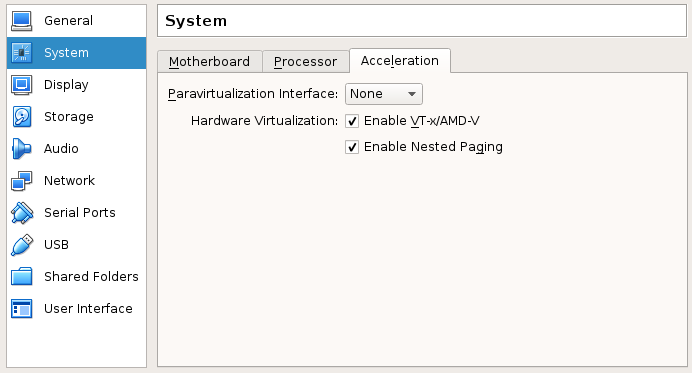 Acceleration configuration
- Set the
- In the
- Install the Microsoft Windows or Linux guest OS of your choice on the virtual machine.
Configure the Virtual Machine
- As REVEN will record the entire system execution, the following configuration steps will optimize the virtual machine characteristics and the scenario recordings:
- Limit the virtual machine RAM to reduce disk footprint.
- Disable any non essential system feature to reduce the trace garbage and the scenario size for faster analysis.
On Linux systems, common optimizations include:
- Disable Xorg server when not needed.
- Disable the console framebuffer if not needed. For example, on Debian systems, in file
/etc/default/grub, add the line: - Disable any unwanted background service.
On Windows systems, common optimizations include:
- Disable desktop graphical effects.
- Disable any unwanted background service.
WARNING:
- Make sure to remove any software that may communicate with the VirtualBox hypervisor from the guest. Intrusive software such as VirtualBox's
Guest additions(which provides extended features like drag and drop, clipboard sharing and full resolution display) may lead to unhandled hypervisor behavior, and the recorded scenario will not be properly handled by REVEN. - Similarly, you must set the
Paravirtualization interfacetoNonein theSettings > System > Accelerationtab of your virtual machine in VirtualBox.
Prepare the virtual machine for scenario generation
- Set the machine in a convenient state to launch and record a scenario:
- Work session opened.
- Minimal services launched.
- Target application ready to execute.
- Etc.
- Autorun - To avoid the need to manually launch the target application inside the virtual machine when a scenario recording is started, set up the guest OS to automatically start the loaders when a disk is inserted:
- On Windows systems: Enable autorun from
Start menu > Autoplay > check "Install from media" for "Software and Games" - On Linux systems:
- Add an entry into the */etc/fstab* file that looks like the following:
- Launch a
wait_cdrom.shscript in background to automatically run the loader once a CD-ROM is inserted. NOTE: Thewait_cdrom.shscript could be:
- On Windows systems: Enable autorun from
Create snapshots of the virtual machine
- Create a snapshot of the virtual machine through the Machine menu or with the default shortcut
HostKey+T.
NOTE: When starting the recording of a scenario, REVEN will restore the snapshot of the virtual machine that was last saved or restored. This allows to keep a clean virtual machine state, even after multiple scenario recordings.
Migration from Virtualbox 4 to Virtualbox 5
Reven uses VirtualBox 5 instead of VirtualBox 4 starting from version 2017v1.4.0. There are consequences for the user migrating from a previous version.
Snapshots
Snapshots created with Virtualbox 4 are not valid in Virtualbox 5 anymore! You must plan your migration before updating. If you didn't, you can still remove Reven altogether, reinstall VirtualBox 4 and then follow the migration guide - simply upgrading Reven will not alter or delete the snapshot files.
In substance, before upgrading Reven's version (which will install VirtualBox 5), you should make full clones of your VM states, shut these clones down, and replace the original VMs with these clones. Then after upgrading, you must recreate the snapshots.
Note that VirtualBox 5's UI will still happily display older snapshots and allow you (or Reven) to try loading – but only to fail, which might be confusing. Manual migration is a mandatory step, and skipping it will result in errors while creating scenarios.
Please also note the following:
- Not only are snapshots incompatible, but VM's current states will be lost as well.
- Only the hard drive states and VM configuration are kept, the latter with some unsafe defaults you will have to change.
- If you have multiple snapshots per VMs, you will have to clone the VM once per snapshot you want to keep, or accept keeping one snapshot only.
- If you have many snapshots (even if useless) in a single VM, deleting them might render your VM unloadable. Starting anew by creating
Full clonesis preferable.
Considering the previous notes, here is the recommended step-by-step procedure:
- For each VM:
- For each snapshot you want to keep:
- Restore it
- Make a
Full Cloneof the VM'sCurrent machine stateat that point
- For each snapshot you want to keep:
- Then again, for each clone you just created:
- Start the VM (this should restore its current state), then properly shut it down.
- You should now delete the original VMs, and rename the clones to take their place. If you created more than one clone per VM, you should reflect those changes in the reven.rc file (see below)
After upgrading Reven, for each VM you should:
- Open its settings and make sure it follows the recommended settings (namely, you will have to force the
Paravirtualization interfacetoNonebecause it is not the default) - Start it and create a base snapshot, as per the snapshot section.
Scenarios
REVEN does not support scenarios generated with VirtualBox 4 anymore, but they should be migrated automatically when installing the new Reven package. It is still recommended to recreate scenarios, because recent additions will make newer scenarios less prone to desynchronisations.
Manual migration is still possible and may be required if you store projects elsewhere: you must then migrate the core file, stored in the analyse directory of your project, using the migration tool migrate_core located in /usr/bin/.
where:
- reven_data_path: is the path to your reven data directory.
- project: is the relevant project.
- core_file: is the core file to migrate. It ends with the extension
.core.
Declaring Virtual Machines for REVEN use
To declare a VM for REVEN use, you must edit your configuration and add the necessary entries and sections.
- (Optional) If you don't have a configuration file, you can copy the default one.
- Add your freshly configured VM to your configuration file:
- In the
vmsentry of the[vbox]section, add the name you wish to give to your VM in REVEN. - Create a new section of that name, and fill the mandatory entries. You can find below a sample configuration for a debian VM: NOTE: For further details about the VM configuration in REVEN, please refer to the Virtual machines section of the Configuration Files Reference Documentation
- In the
- Reload the REVEN service:
Optional: Multiple user setup
The REVEN server can accomodate several Axion users simultaneously. By default, a unique user named reven is created during package installation.
REVEN users are completely separate from local users of the system: adding (or removing) a directory in the REVEN data folder (whose path is specified in the build.rc file, see global configuration) creates a new (or deletes an existing) REVEN user.
Assuming the project data folder is /home/reven/reven_data, adding a new REVEN user foo can be done with the following commands:
Optional: Leveraging Microsoft Windows information
PDB symbols
REVEN can leverage Windows debugging symbols available as PDB files to enhance the readability of the execution trace. These files must be copied to the directory specified in the pdb_path configuration entry.
Retrieving PDB files
A PDB file associated to a binary can be downloaded from a Microsoft Symbol Server by using symchk.exe.
To retrieve all PDB files for every binary in C:\Windows\system32 use the following command:
WARNING:
- REVEN currently supports PDB format v7.0. Most PDB files are in that format except some for Windows XP and older.
- REVEN now matches PDB files to their corresponding binary using the latter's GUID. Be sure to get the right PDB file otherwise it will not be loaded.
IMPORTANT: PBD parsing, if you have thousands of them, can significantly slow down REVEN instances startup time. You can either try to create subdirectories per OS to reduce the number of files to load, and/or place the pdb directory on an SSD disk.
Windows API documentation
REVEN can also use an API documentation XML file in order to provide advanced information such as parameter types, names and calling convention. This XML file can be generated by extracting and parsing the MS Windows help files:
Extracting HxS help files (shipped with Visual Studio SDK 2005 and 2008)
In order to have a local copy of the MSDN documentation:
- Download the Visual Studio SDK installer from the Microsoft website (tested with the SDK for Windows 7 and .NET 3.5 SP1).
- Install the documentation packages.
Visual Studio SDK packages selection
Now you need to extract the HxS files, which can be done with an archive extractor like 7zip.
On Microsoft Windows systems, to extract the HxS files located in C:\Program Files\Microsoft SDKs\Windows\v7.0\Help\1033 (the default installation path) to the C:\extracted_hxs_files directory, execute the following command:
Alternatively, on Linux systems, to extract the HxS files located in ~/hxs_files into ~/extracted_hxs_files, execute the following commmand:
Generating the REVEN msdn.xml file
Once the HxS files have been extracted, the final XML file can be generated with the msdn-crawler.py script shipped with REVEN and located in /usr/share/reven/scripts/
On Microsoft Windows, assuming you copied the crawler script from the Axion installation:
On Linux systems:
Finally, copy the generated msdn.xml into the pdb_path directory (see the virtual machine configuration reference).