QEMU Virtual Machines
Pre-requisites
IMPORTANT: QEMU is installed during the REVEN server installation process.
The next sections introduce useful QEMU notions to work with REVEN:
- KVM vs Emulated QEMU VMs.
- Disk and live snapshots in QEMU.
KVM vs Emulation
There are two ways to run VMs with QEMU: either using KVM (virtualized mode) or emulated. The former is much faster, but the latter is required when recording. Saved VM states cannot be shared between the two modes, but disk snapshots can.
In the Project Manager's VM view you can select either modes, but when recording a scenario only the emulation mode is available.
KVM mode is convenient when installing software or OSes. See typical workflow below.
For a complete documentation on QEMU tools, please refer to QEMU's online documentation.
How do snapshots work in QEMU
IMPORTANT This section is crucial: REVEN uses the native disk / live snapshot mechanism from QEMU which might differ from what users expect.
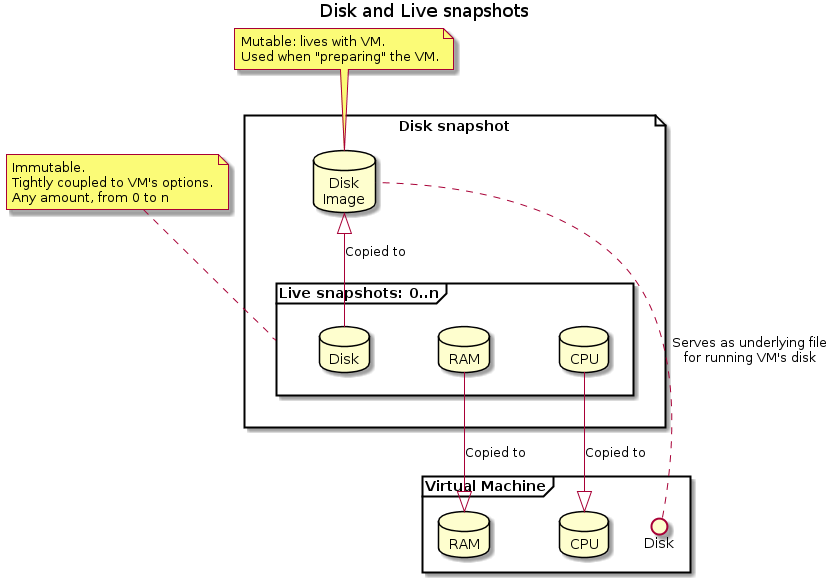
There are two types of snapshots available in the qcow file format:
- Disk snapshots represent the state of a disk, and may be organized in a tree structure to save disk space.
- Live snapshots represent the full state of a VM, including memory, cpu registers and disk. They are stored inside a disk snapshot, and are what most users expect.
The two are used in conjunction to provide various functionalities:
- Live snapshots allow the user to store the full state of a VM:
- Loading a live snapshot will allow restoring a VM that is booted.
- These are tightly coupled to the options the VM has been started with: not selecting the right options will prevent snapshots from loading. These options include "kvm", "network", or any custom option.
- They are immutable by design
- Disk snapshots contains the disk only:
- They are mutable: they live with the VM
- Loading a live snapshot will alter the disk snapshot, by restoring it to the saved state. Any modification is lost.
- Starting a VM from a disk snapshot will, by design, require a full boot.
- They can be linked to parent disk snapshots, to limit disk usage on the host. Note that altering a parent snapshot may render children unusable!
Adding QEMU VMs for scenario recording
REVEN will search for .qcow2 files in the directory identified as
QUASAR_QEMU_SCAN_PATH in your settings (by default, ~/VMs).
- Copy or create a disk image to the
QUASAR_QEMU_SCAN_PATH. You need access to a console to the server to do so. - Create an initial disk snapshot which will serve as a base.
You can then boot the VM and create a first live snapshot.
Working with QEMU snapshots in REVEN
IMPORTANT NOTE: QEMU replayers do NOT support VMs with strictly more than 3072MB of RAM. DO NOT try to record with more than 3072MB of RAM or the replay will fail. The Project Manager web interface will prevent you from doing that.
In the Project Manager:
- You register a QEMU VM and corresponding disk snapshots are automatically
linked. Besides, both disk and live snapshots can be created.
- Disk snapshots (usually generated with QEMU
qemu-img) can be taken through the Take snapshot button on the VM list page. NOTE: Disks snapshots imply booting the VM, which can be quite long with QEMU without KVM (several minutes for a Windows 10 VM). - Live snapshots (usually generated with QEMU
savevm) can be taken through the Manage button on the VM list page, then in the Running the VM section. You can also access them on the record page of a scenario.
- Disk snapshots (usually generated with QEMU
QEMU snapshots options
By default, when you start a snapshot, it is launched with the VM options (RAM size, network, custom QEMU options) that were provided during the Register VM step. You can override these options for this specific snapshot in the Running the VM section. Overridden options for a snapshot will be applied when starting the VM on this snapshot. You can restore an option to its VM value by unchecking the checkbox associated to this option.
Typical QEMU workflow example
To illustrate the previous explanations, here is how users can typically work with QEMU to configure and prepare a VM before recording a trace:
In the Project Manager VM Manager
- Register an existing QEMU VM.
- Create a disk snapshot for a new project from a clean parent.
- Boot this snapshot with KVM enabled.
- Install required software (using the CD-Rom mounting feature to upload files to the VM).
- Properly shutdown the VM (on Windows, using
Shift+Clickon theShutdownoption is required, otherwise the VM is only hibernated!). - You can now
Preparethe snapshot: all required binaries are present on the disk. - Boot the VM again in emulated mode, i.e. with KVM disabled, with the required options for recording.
- Run operations required before the scenario recording but that need not be recorded.
- Take a live snapshot.
WARNING: live snapshots taken with KVM enabled can not be used for recording in REVEN Project Manager with QEMU.
Then, in the Scenario Manager
- Create a new scenario, selecting the previously created disk snapshot.
- Load the previously created live snapshot.
- Record your trace.
- Force shutdown the VM.
NOTE: At this point, the disk snapshot contains an OS that didn't properly shutdown: it is usually not an issue because restoring the live snapshot will overwrite this state, but booting the VM from the disk snapshot itself will likely trigger any disk verification process the guest OS may have.
NOTE: You can save live snapshot during scenario creation as well, if necessary.
NOTE: For simpler situations, you might have a few live snapshots in emulation mode for various use cases: one with network, one without, etc.
Help! My snaphost doesn't load!
There are a few situations that will prevent a snapshot from loading. In all cases, you can go to the list of Sessions in the Project Manager to get the log of what went wrong. Several checks can be done, depending on the type of snapshot concerned.
Live snapshots
- Make sure the selected options match that of the live snapshot, including kvm mode and custom options. As a convenience, the snaphosts's name contains a summary of common ones.
Disk snapshots
- Has the VM been properly shutdown? (
Shift + ClickonShutdownin windows) - Have the parent disk snapshot been modified? If so, children snapshots are unusable
Note that in some cases your disk snapshot may become corrupted leading to the error Image is corrupt; cannot be opened read/write when launching QEMU. It can sometimes occur when having heavy disk I/O or killing QEMU.
To assert the level of corruption of your snapshot you can use the command qemu-img check /path/to/your/snapshot.qcow2.
A possible fix is to ask qemu-img to fix the corruption qemu-img check -r all /path/to/your/snapshot.qcow2.