Creating a new VM from an ISO
You can create a QEMU .qcow2 VM by installing an operating system from an ISO.
The Project Manager does not guide you through all steps required for this operation. As a consequence, in conjunction with using the VM import Wizard, you will also need to run commands via a terminal on the machine REVEN is runnning on. Below are two recommended methods to approach this.
IMPORTANT: This page will assume you are familiar with how to import a VM.
For both methods, you need to know where the Project Manager stores the virtual machine's disks (see VM storage location) - in the steps below, we will call this path /path/to/VMs/.
You must also copy your installation ISO file on the server by your own means (sFTP, scp, or other). In the next steps, we will call the path to the ISO file /path/to/ISO.
Without direct or SSH access
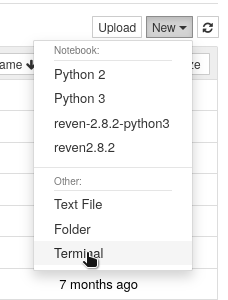
- In the Project Manager, open the NOTEBOOKS link in the page's footer to open Jupyter.
- Once in Jupyter, open a new terminal session as follow:
- From the terminal, run
qemu-img create -f qcow2 /path/to/VMs/myimage.qcow2 80G, where/path/to/VMs/is the VM directory found above. Note you should adapt the name and size of the disk to your requirements. - Once this disk is created, you can start importing it using the Project Manager VM import Wizard as described in previous sections.
- When asked to create a child snapshot, do so (even if this disk is still empty). Write the name down, we will refer to it as
root. - The first time the Wizard requests you start the VM:
- Check "Override custom options",
- Enter the custom option
-cdrom "/path/to/ISO", - Click on "Start" to start the VM with your ISO file.
- If the VM does not show up, use the link "Show in browser". Your ISO file will take precedence in the boot as expected, allowing you to install the VM.
- Once your VM is installed, shut it down properly.
- Leave the Wizard open at this step and go back to the Jupyter terminal.
- At this point, your base disk is empty, and your OS has been installed to the first disk snapshot. Instead we want the base disk to contain this vanilla installation, and later use the first snapshot to lighten the VM further. Hence, "commit" all changes to the base image using the command
qemu-img commit /path/to/VMs/myimage.qcow2.snapshots/root.qcow2. - You can now close the Jupyter terminal. Head back to the Wizard. You might get a warning on this page, in which case simply click on the "Refresh" button.
- Uncheck "Override custom options" then click on "Save Setings".
- You are now back into the normal workflow: you can stay at this step to perform the necessary operations to make your VM lighter on
rootby disabling unnecessary services (see Guest Configuration), then continue on to create the first live snapshot and finish the Wizard.
With direct or SSH access
If you have direct access to the server and can log into it, or if you can connect to it via SSH, you can run steps similar as above but using your access instead of the Jupyter terminal:
- Get a shell on the server using your SSH or direct access. Make sure you are connected as the user that is running REVEN.
- Continue on with the procedure above, using this shell instead of Jupyter's.
Moreover, if you can run a GUI application on the server (X-forwarding or direct graphical access), you can chose to pre-install the OS to the new disk image prior to importing it in REVEN. Below is a general list of steps you can take in this situation:
- Start your terminal session allowing for GUI application: either by logging into the server's desktop, or by starting an SSH session with X-forwarding (
-Xor-Y). - Execute the command
source /path/to/REVEN/install/sourcemeto make sure you have access to the necessary binaries. - Create your VM disk with
qemu-img create - Manually start the VM, with the iso inserted by running
panda-system-x86_64 -m "2048M" -hda "/path/to/VMs/myimage.qcow2" -usbdevice tablet -enable-kvm -cdrom "/path/to/ISO". Again, adapt parameters as needed. - The VM should show up on your screen and start the installer from the ISO file. Continue on with the installation.
- Shutdown the VM properly.
- You can now run the Project Manager's Wizard to import your newly created VM disk.
You now have a ready-to-use VM! You can head over to Scenario to record scenarios and more.