Installing REVEN inside a VM
This section provides guidelines to install REVEN in a virtual machine.
Tetrane provides disk images in various formats, in order to support multiple hypervisors and configurations. Tetrane does not provide directly importable VM files, so you will need to setup a VM in your hypervisor to use this disk.
This page describes the common principles and steps for the installation or the upgrade of a REVEN version. Subsections will provide hypervisor-specific step-by-step instructions.
The latter subsections may not be exhaustive - please inform Tetrane if you think some specific hypervisor or version should be documented here.
Requirements
- The REVEN VM must be able to run VMs itself. Nested virtualization must be supported by the hypervisor and the host CPU.
- REVEN's requirements apply on the guest VM, with the caveat that REVEN's data must be stored on a dedicated VM disk, whose image itself is stored on a fast drive as required.
Installation
VM Creation
In order to install REVEN in a VM, you must:
- Download the REVEN VM installation disk (links in the purchase email).
- Create your VM accordingly (see below for the step-by-step instructions per hypervisor). This will include:
- Creating a new VM in your hypervisor and attaching the downloaded REVEN disk,
- Creating and attaching a second disk image for actual storage of REVEN's data,
- IMPORTANT: see the disk requirements - this storage disk file must be stored on a fast, flash-type disk.
- Activating the nested virtualization which is usually off by default,
- Configuring the network so that the host can access the VM's network services.
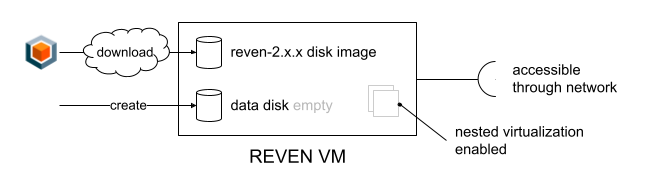
Note that regardless of your specific configuration, the VM must detect the disks as follows:
- REVEN's disk image must be found at
/dev/sda - The created data storage disk must be found at
/dev/sdb
Here are more detailed instructions for various hypervisors:
- VMware Workstation.
- Microsoft Hyper-V.
- QEMU-based hypervisors for QEMU, virt-manager and Proxmox.
Follow the instructions from one of these pages, then proceed to the next step.
First boot
Once your VM is properly configured, you can boot it up for the first time. The REVEN disk image will:
- Initiate a setup wizard for various items such as the keyboard,
- Properly detect the storage disk,
- Initialize the REVEN installation.
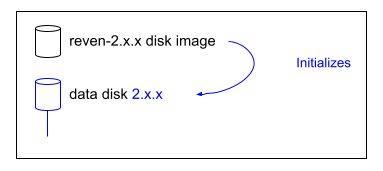
IMPORTANT: Note that once initialization is complete, the data storage disk has also been initialized and cannot be replaced with a new empty disk.
Moreover, any time you start the VM, it will check the configuration meets REVEN's requirements on CPU count and RAM size.
If everything was configured properly, you will see the VM's welcome screen:
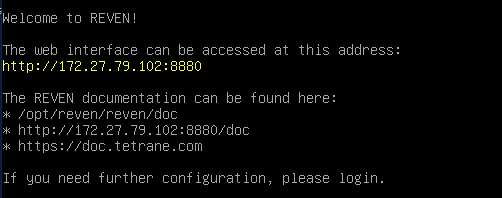
Your REVEN VM is now properly configured, you can finalize the installation by installing your REVEN license.
Usage specificities of REVEN in a VM
Connection
You can use REVEN by pointing a browser to the URL shown in the VM's welcome screen.
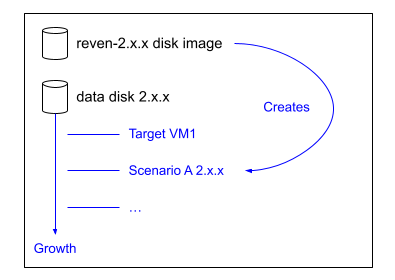
Storage disk growth
Throughout your usage of REVEN, the storage disk will grow in size:
If this disk ends up too small for your usage (and you cannot clean up past projects), you can expand it:
- Properly shut the REVEN VM down (ACPI shutdown in your hypervisor).
- Using your hypervisor's tools or setting pages, grow the storage disk file.
- Boot the VM back up: it will automatically detect that the underlying disk has grown and resize the filesystem to accomodate the available space.
Upgrading REVEN
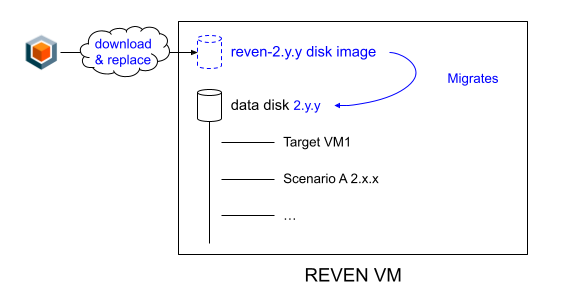
When a new version of REVEN comes out, you can simply upgrade your VM following the procedure below. Note that custom changes made to the system of your REVEN VM will have to be made again after the upgrade (installation of VM tools for example, installation of utilities, etc.) as the disk containing the OS will be replaced.
- Download the new REVEN disk image corresponding to your hypervisor.
- Properly shut the REVEN VM down (ACPI shutdown in your hypervisor).
- Using your hypervisor's setting pages, replace the REVEN disk image with the newly downloaded one.
- Make sure the new disk image takes the exact same spot hardware-wise, so that it is still detected as
/dev/sda - Keep the existing storage disk as is.
- Make sure the new disk image takes the exact same spot hardware-wise, so that it is still detected as
- Boot the VM back up:
- It will take you through the setup wizard again.
- It will detect the existing installation in the storage disk & upgrade it to the new version.
- Note that, if necessary, you will still have to migrate each scenario to the newer version via REVEN's Project Manager as with any other installation.