Windows 7
This section will cover downloading an existing, freely available Windows 7 Virtual Machine, uploading it to REVEN and configuring it to make it a good recording environment.
Downloading the VM
Microsoft provides Windows 7 Virtual Machines that can be downloaded from the Internet. For this guide, we will use the IE11 VM from the Tool VMs page.
- Navigate to the Tool VMs page VM page
- Please review the license terms.
- Select the
IE11 on Win7 (x86)VM, then theHyperVplatform. - Click on Download.
- Unzip the
IE11.Win7.HyperV.zipfile you just downloaded on your machine.
Note that the Windows 7 VMs provided by Microsoft are 32-bit machines. You can use your own 64-bit VM with REVEN, but this guide assumes you are using the IE11 32-bit VM.
Provisioning the VM disk
We will now upload the IE11's disk to the REVEN server, a step known as provisioning:
-
Open up your REVEN installation's Project Manager (by default, point a web browser to
http://<your_reven_host>:8880) -
Select the
VM Managertab. -
Click on
Register QEMU VM
-
The VM Import Wizard welcome screen shows up - click on
Start. -
In the
Select VMscreen, locate theProvision a new VMsection and click onUpload a new VM file from disk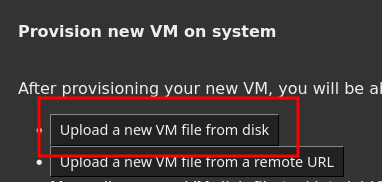
-
Click on
Browse. -
On your disk, select the
Virtual Hard Disks/IE11 - Win7.vhdxextracted from the archive earlier. -
Click on
Upload.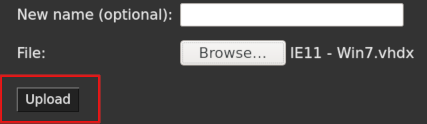
-
When the upload is over, click on
Next. You are back at theSelect VMscreen.
Registering the VM
Now that the VM disk is available to the REVEN server, it is time to register it as a new VM.
Starting the registration
-
After the end of the provisioning step, you were taken back to the
Select VMscreen. -
Locate the
Register a new VMsection. -
Ensure the disk file we uploaded is selected in the combo box. If not, select it.
-
Click on
Register.
-
This disk requires conversion to the
qcow2format used by REVEN:- Check
Remove original file. - Click on
Convert. - When the operation is over, click on
Next.
- Check
-
In the
Specify guestpage, select the following options for this VM:-
OS:
Windows. -
Architecture:
x86. -
Leave the other options unchanged.
-
Click on
Next.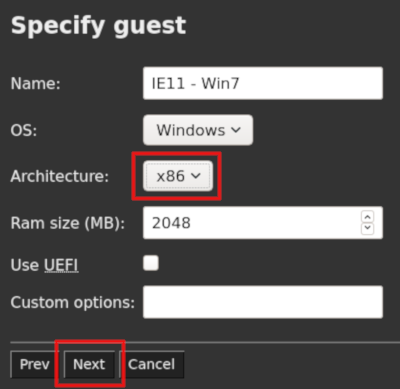
-
-
On the
Create disk snapshotscreen, clickNext.
Booting the VM for the first time
We are now ready to boot this disk for the first time.
- Boot the VM:
- Check
Enable network. - Click on
Start. - Click on
Show in browser: the VM screen appears in a new tab or window. - Wait for the desktop to appear. No login is necessary. If needed, the password is
Passw0rd!(as specified on the Microsoft VM page). - The VM might request a restart on the first boot. Kindly oblige.
- Check
Configuring the guest
Now that the VM is booted, it is time to configure the guest environment:
-
In the Project Manager, click on
Insert Windows 10 lightener CDROM.NOTE: Despite the name, this CDROM contains utilities that are useful for Windows 7 too.
-
Go back to the VM screen.
-
Disable the KPTI protections:
- Point a file explorer to the CD-ROM drive.
- Right-click on the file
disable-kpti.batand selectRun as administrator. - Wait for the VM to reboot.
-
Finally, make the VM lighter:
- Disable Windows Defender:
- Press Windows+R to make the "Run" window appear.
- Type in
gpedit.mscand press Enter. - Navigate to
Local Computer Policy\Computer Configuration\Administrative Templates\Windows Components\Windows Defender\. - Double-click on
Turn off Windows Defender Antivirusand set theEnabledradio button. - Click OK or Apply to close the Group Policy editor window.
- Force .NET 4 precompilation step:
- In an admin shell, type in:
C:\Windows\Microsoft.NET\Framework\v4.0.30319\ngen.exe update /force.
- In an admin shell, type in:
- Disable Windows Defender:
Installing tools
At this point, we have done everything that is strictly necessary for REVEN. However, it is a good idea to install Visual Studio's runtimes and other tools to make using this VM easier.
- From your VM, open up the Internet Explorer browser.
- If the network does not work:
- Go back to the Project Manager
- Click on
ACPI shutdown. - Check
Enable network. - Click on
Start. - Wait for the VM to boot: the network should now work.
- Install the following tools - you can type the page's URLs or search for their title in your favorite search engine:
vc_redist.x86.exefiles from The latest supported Visual C++ downloads - at least the 2019 and 2013 versions.
At this point, optionally you can also install any software you might want: a web browser, etc.
Finishing configuration
Now that your VM is configured, turn it off:
- Go back to the Project Manager.
- Click on
ACPI shutdown. - Click on
Next. - You can skip
Finalize VM preparationso Click onNextagain.
Taking the first Live Snapshot
Now that the VM is off, it is time to boot it into Emulation mode (which is the mode we can record in) and take a handy live snapshot for future recording sessions:
-
Click on
Start. -
Click on
Show in browser. -
The VM will now automatically boot and log in. Wait a few minutes for the desktop to appear - this is slower than earlier, because of the emulation mode.
-
The VM will prompt you for a reboot due to the change in device drivers that accompany switching to Emulation Mode. Let it reboot.
-
We know Windows shows the desktop as soon as possible but keeps starting processes in the background. At this point, we want to wait until the boot process is effectively finished:
- Right-click on the Start menu and click on
Start Task Manager. - Wait for the
System Idle ProcessCPU value in the "Processes" tab to be around 80-90% for a while- usually the Task Manager itself will consume about 10-15%. - Close the task manager.
- Right-click on the Start menu and click on
-
We will often use a command-line during recording sessions, so we might as well start one now:
- Press Windows+R
Run. - Type in
cmdand press Enter. - Wait for the shell to appear.
- Press Windows+R
-
The VM is ready, it is time to take our live snapshot:
- Go back to the Project Manager.
- Locate the
Take a live snapshotfield. - Type in a name,
booted-cmdfor instance. - Click on
Save.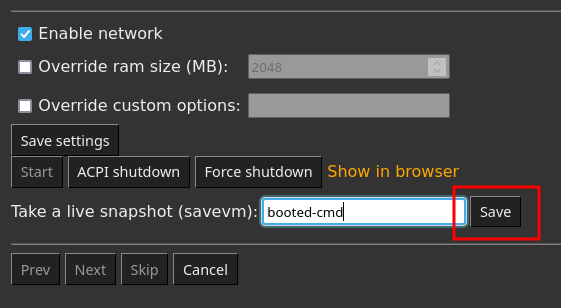
-
Now that a live snapshot exists, we can safely force shutdown the VM because we will always be restoring a known good state: click on
Force shutdown. -
Click on
Next.
Preparing the snapshot
- On the
Prepare the snapshotscreen, click onPrepare. - Wait for the task to finish. This will take several minutes.
- Click on
Finish.
And that is it! We now have a VM with a guest environment tuned for a good recording experience. It is time to Record our first scenario.