Importing an existing VM
The Project Manager offers a VM import Wizard that will guide you through the process of importing a VM disk by provisioning, registering and preparing a QEMU VM in REVEN.
Typical import
In a typical import case, you will use the VM import Wizard to:
- First, provision your VM, that is, make the disk image available to REVEN.
- Then, registrer it so that REVEN can use it. This step also gives you the opportunity to perform some necessary configuration.
The Wizard guides you through each step, so you don't need to remember them all. However, understanding the process will help you:
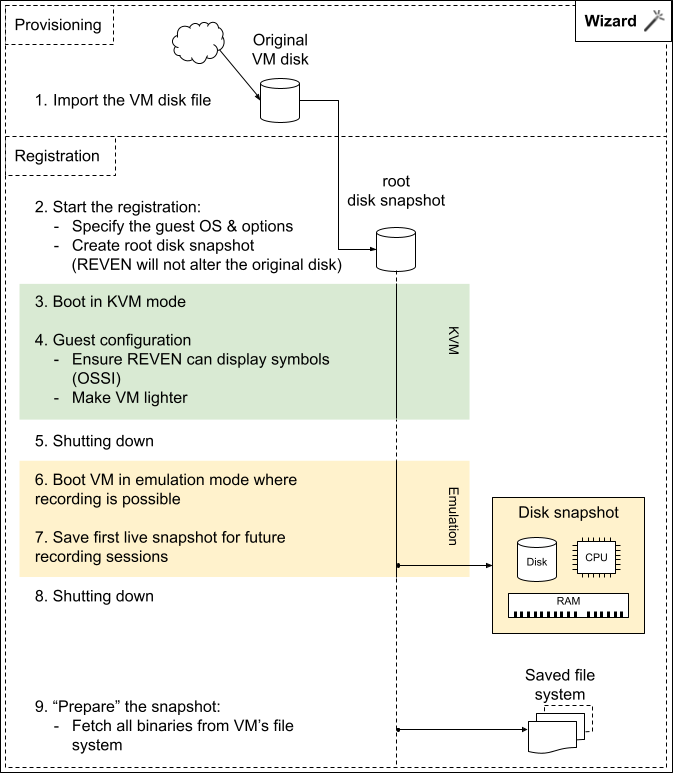
The reason we create a live snapshot of the booted VM is because it is much more convenient to restore one when getting ready to record a scenario, rather than boot the VM from the start.
If you wonder why we need to mix KVM and Emulation mode, please read the Need to Know page.
Provisioning an existing VM
Provisioning a VM means somehow putting a VM disk to the proper location on the server so that REVEN can have access to it. There are multiple possibilities of doing so.
- Using the Project Manager:
- Open the
VM Managerpage. - Click on
Register QEMU VMto start the VM import Wizard - Select one of the two
Provisionoption by click on either button - Follow the wizard to upload a disk image (see supported formats)
- Open the
- Alternatively, you can manually copy a
qcow2disk image to the VM storage location.
You should now see the VM disk image appear in the Register new VM section of the Wizard's VM Setup page.
Registering a provisioned VM
Registering a VM will allow REVEN to use it to record scenarios. The Wizard will guide you through a collection of steps that include settings REVEN options, possibly configuring the guest OS, and ultimately creating a live snapshot. See typical import above.
You must use the Project Manager's Wizard to register a VM:
- In the Register new VM's combo box, select the VM disk to use
- Click on Register VM
- Follow the Wizard. Below are details about some of the steps it takes:
- In the Specify guest page:
- Specify the target OS & architecture, and RAM size.
- Check "Use UEFI" if the OS has been installed with UEFI support only. Otherwise, legacy BIOS will be used.
- You can leave Custom options empty.
- The Configuration of the windows guest is a very important step, please read Guest configuration.
- In the Create live snapshot you will boot your VM in emulation mode.
- Wait a bit after boot to ensure the CPU activity is low enough (idling at 10% is good) before taking the snapshot: it is common for OSes to display some background activity right after booting up.
- Finally, when asked to "Prepare" the snapshot, please click on the Prepare button. If you skipped this operation, you can still prepare it later while on the snapshot's details page.
- In the Specify guest page:
You now have a ready-to-use VM! You can head over to the Scenario section to record scenarios and more.