Linux
This section will cover downloading a pre-configured Linux Virtual Machine from the Tetrane website, uploading it to REVEN and registering it to create a recording environment.
Downloading the VM
Tetrane provides multiple resources from its website, including pre-configured VMs for use as recording environments.
-
Navigate to the Tetrane VMs page.
-
Choose one of the distributions - this guide assumes you picked Fedora 27.
NOTE: If using the Free Edition, the only compatible distribution is Debian 9 Stretch, so choose this one.
-
Download either the
qcowor thezipversion. -
If you chose the
zipversion, unzip the archive you downloaded.
Provisioning the VM disk
We will now upload the VM disk to the REVEN server, a step known as provisioning:
-
Open up your REVEN installation's Project Manager (by default, point a web browser to
http://<your_reven_host>:8880) -
Select the
VM Managertab. -
Click on
Register QEMU VM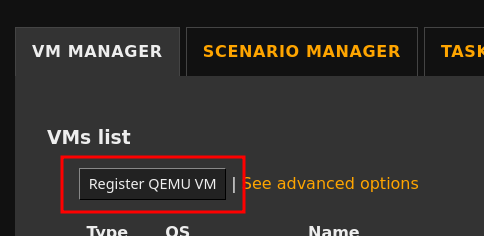
-
The VM Import Wizard welcome screen shows up - click on
Start. -
In the
Select VMscreen, locate theProvision a new VMsection and click onUpload a new VM file from disk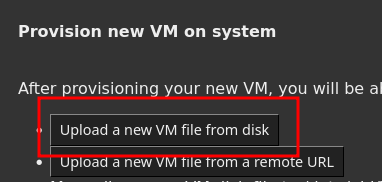
-
Click on
Browse. -
On your disk, select the
*.qcow2disk image file extracted from the archive earlier. -
Click on
Upload.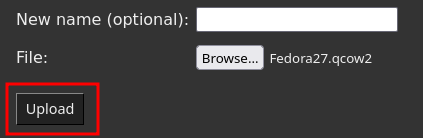
-
When the upload is over, click on
Next. You are back at theSelect VMscreen.
Registering the VM
Now that the VM disk is available to the REVEN server, it is time to register it as a new VM.
Starting the registration
-
After the end of the provisioning step, you were taken back to the
Select VMscreen. -
Locate the
Register a new VMsection. -
Ensure the disk file we uploaded is selected in the combo box. If not, select it.
-
Click on
Register.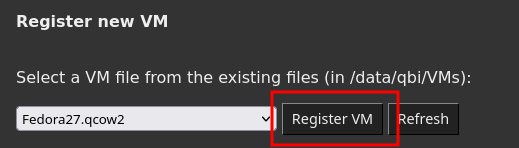
-
In the
Specify guestpage, select the following options for this VM:-
OS:
Linux. -
Architecture:
x64. -
Leave the other options unchanged.
-
Click on
Next.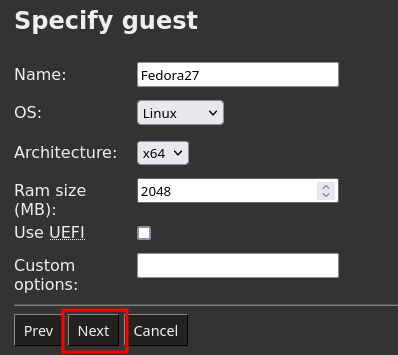
-
-
On the
Create disk snapshotscreen, clickNext.
Booting the VM for the first time
We are now ready to boot this disk for the first time.
- Boot the VM:
- Check
Enable network. - Click on
Start. - Click on
Show in browser: the VM screen appears in a new tab or window. - Log in: the user is
robertand the password - Wait for the desktop to appear.
- Check
Configuring the guest
The VM you downloaded is already configured to be a good recording environment, so you don't have to do anything in that regard. Notably:
- It is a compatible kernel.
- KASLR and PTI have been disabled.
- Debug packages are generally downloaded on the disk.
- A light desktop environment is installed (Xfce).
Installing tools
At this point, you can install more software on the VM if you want, but this is not strictly necessary. Here are some general guidelines:
- If you pull software from the package manager, pull the debug packages along as well to make sure you get symbols later on.
- Do not update the VM - REVEN supports a certain set of kernels and you would risk going out of the perimeter.
Finishing configuration
Now that your VM is configured, turn it off:
- In the VM screen, click on
Applications,Log out,Shut Down. - Back to the Project Manager, click on
Next. - You can skip
Finalize VM preparationso Click onNextagain.
Taking the first Live Snapshot
Now that the VM is off, it is time to boot it into Emulation mode (which is the mode we can record in) and take a handy live snapshot for future recording sessions:
-
Click on
Start. -
Click on
Show in browser. -
Wait a few minutes for the login screen to show up and log in - this is slower than earlier, because of the emulation mode.
-
Wait for the desktop to appear.
-
Linux will keep initializing things in the background, so we want to make sure the boot process is effectively over:
- Open up a Terminal emulator if one is not started automatically.
- Type in
htop. - Wait for the general CPU activity to be below 20%.
- Quit
htop.
-
We will often use a command-line during recording sessions, so keep this one open, although you can call
clear. -
The VM is ready, it is time to take our live snapshot:
- Go back to the Project Manager.
- Locate the
Take a live snapshotfield. - Type in a name,
booted-cmdfor instance. - Click on
Save.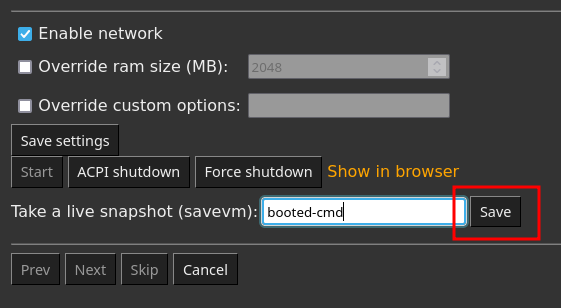
-
Now that a live snapshot exists, we can safely force shutdown the VM because we will always be restoring a known good state: click on
Force shutdown. -
Click on
Next.
Preparing the snapshot
- On the
Prepare the snapshotscreen, click onPrepare. - Wait for the task to finish. This will take several minutes.
- Click on
Finish.
And that is it! We now have a VM with a guest environment tuned for a good recording experience. It is time to Record our first scenario.